Display extra column in the PrestaShop Grid
🛠️ Tech Evangelist at @PrestaShop • Core Maintainer • Communication • Public speaking • Technical Marketing
🚀 15+ years in e-commerce • Led dozens of successful PrestaShop projects
🧭 impSolutions agency founder • Experts in PrestaShop development
🎤 Public speaker • Passionate about community building and OSS
💬 Ask me anything PrestaShop – code, strategy, or project direction
This article is about PrestaShop version 1.7.7 and above.
The order list in PrestaShop has quite a bit of information about them. One piece of information missing, however, is the name of the selected carrier.
In this article I will walk you through the module that I published here:
https://github.com/kpodemski/kporderlistcarrier
This module allows you to add carrier name to the order list and filter by it. The whole thing is based on Hook, which is available in PrestaShop standard but it works only with the Symfony version of this page. That is why the module will work only for PrestaShop 1.7.7+
How it works. Grid component
At this moment, any list of elements taken from the database, on pages that have been migrated to Symfony in PrestaShop, uses a new component: Grid.
This component is similar to HelperList, which you may know from older versions of PrestaShop. HelperList is still present in the core, but you might want to use a modern alternative, which is Grid.
With this component, we will display a list of elements e.g. from the database. We will add options to search through it, sorting, we can also enable various operations on records, deleting, editing, or other. We can also define them ourselves.
Detailed information about the component is available in PrestaShop developers' documentation, you can find there examples of usage, default data types and much more about this component.
Example module
The solution I linked above uses the ability to modify the lists created by this component, directly from within the module. As you can see, I have attached to two Hooks:
/** @var array */
public const MODULE_HOOKS = [
    'actionOrderGridDefinitionModifier',
    'actionOrderGridQueryBuilderModifier',
];
The names of these Hooks are dynamic. You may want to hook to the customer list instead of the order list by replacing Order with Customer. You can find yet another example that executes hooks like these in the file: /src/Core/Grid/GridFactory.php.
/**
 * {@inheritdoc}
 */
public function getGrid(SearchCriteriaInterface $searchCriteria)
{
    $definition = $this->definitionFactory->getDefinition();
    $data = $this->dataFactory->getData($searchCriteria);

    // Here it is, hook that will modify the Grid data
    $this->hookDispatcher->dispatchWithParameters('action' . Container::camelize($definition->getId()) . 'GridDataModifier', [
        'data' => &$data,
    ]);

    $filterForm = $this->filterFormFactory->create($definition);
    $filterForm->setData($searchCriteria->getFilters());
    return new Grid(
        $definition,
        $data,
        $searchCriteria,
        $filterForm
    );
}
The Hook name is created as follows:
action<Identifier of a given component>GridDataModifier.
The identifier is for example:
const GRID_ID = 'customer';
This const is defined here: /src/Core/Grid/Definition/Factory/CustomerGridDefinitionFactory.php
Once we are hooked to the appropriate places in the core, we can execute our code. As it usually happens, in the implementation of a given Hook we get in the $params array, the appropriate "tools" to be able to modify the selected component.
In the case of hookActionOrderGridDefinitionModifier, we have access to the Grid component definition, which is hidden behind the GridDefinitionInterface implementation.
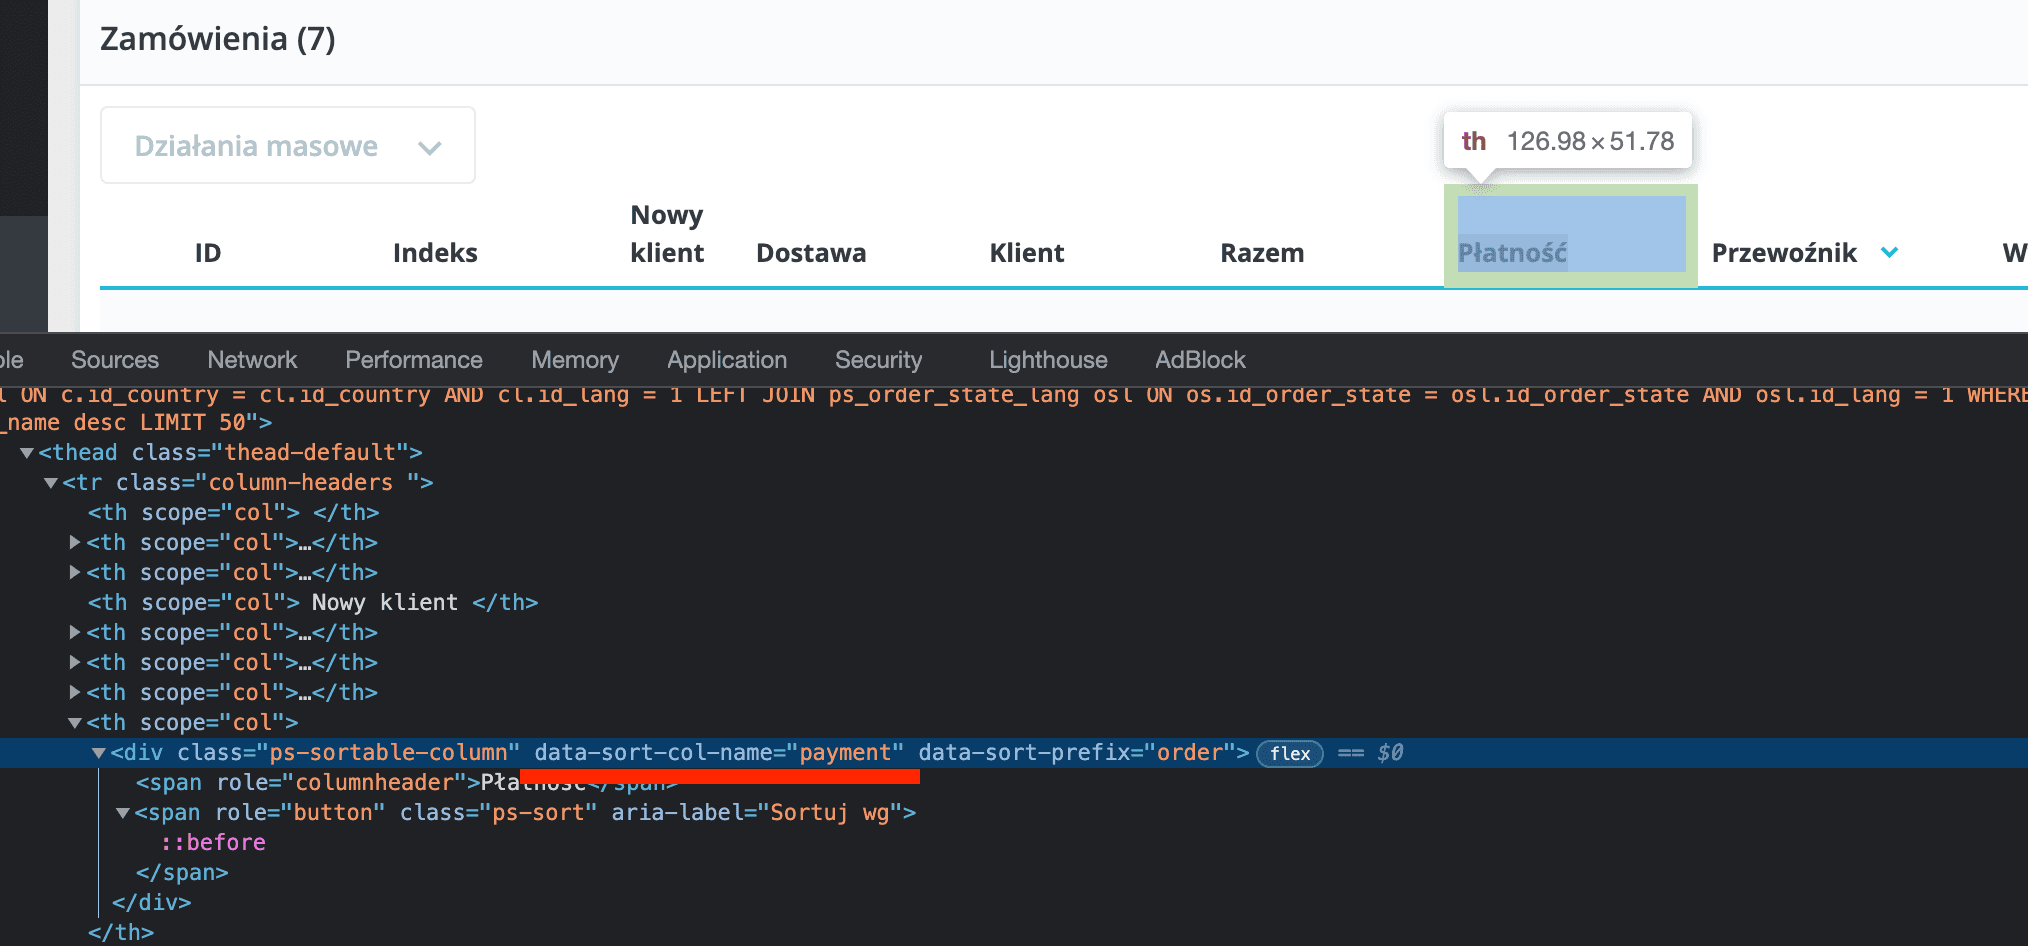
Using the $definition variable in the code, we can manipulate the columns in the listing. In the case of the sample module, we add the carrier_name column, which we display after the payment column. How do we know that the payment name column is payment? We can use, for example, the developer tools in the Chrome browser:

Next, we assign a filter to the column so that we can look for orders that should be shipped with the carrier we are looking for:
$filters = $definition->getFilters();
$filters->add((new Filter(static::CARRIER_FIELD_NAME, TextType::class))
    ->setTypeOptions([
        'required' => false,
    ])
    ->setAssociatedColumn(static::CARRIER_FIELD_NAME)
);
The code that allows us to retrieve the carrier name is a bit more complicated, but the principle is the same. We get the $params argument to modify the information retrieval for a given list and we do what we need with it.
The Grid component does not use the database legacy code, but the Doctrine one, $params['search_query_builder'] is a Doctrine instance of QueryBuilder.
In the addSelect method we can... yes, add the fields we want to retrieve. This works very similar to the DbQuery class that you may now from PrestaShop core.
It may puzzle you that at this point in the code:
$queryBuilder->addSelect(
    'IF(carrier.name = "0", "'.Configuration::get('PS_SHOP_NAME').'", carrier.name) carrier_name'
);
We check that the record is not "0". We do this because PrestaShop will set "0" when we select a carrier, which is added by default in the installer as "In-Store Pickup". This is a relic of the past, which should be straightened out in version 8.0 🙂
In the following code snippets, we already rely on search criteria. With this code, we control how we sort the listing and possibly filter it.
The whole process may seem very similar for developers who have already worked with Hooks like actionSomethingListingFieldsModifier. And, of course, it is.
Advanced Grid usage
Of course, the sample module that I give you is the simplest example of how to modify the Grid component. Grid is a very flexible mechanism that will allow you to add your own implementation of various mass actions that can be performed on records. There are also many possibilities of formatting the output data, etc.
I encourage you to read the documentation for developers and check the repository with more sample PrestaShop modules here.
btw. this is my first article here, your feedback will be a gift 🙏🏻